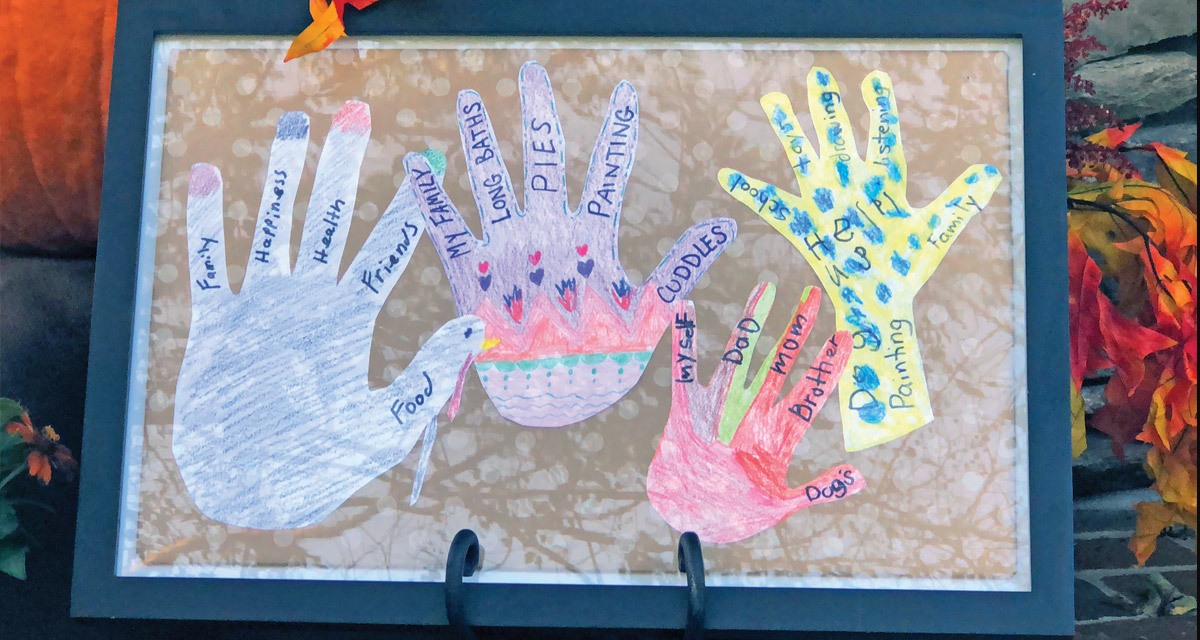
The turkey has been carved, the pies are cooling, and the sides are all out at the table. The final and most meaningful part of Thanksgiving begins—the circling around the table to share what we are thankful for with our friends and family. Have you ever wanted to immortalize those sweet moments when your eight-year-old says he’s thankful for learning to play catch with his father, and then your five-year-old follows up with being thankful for farts? Get ready for a fun and surprisingly professional-looking craft you can display in your home for years to come!
Supplies:
- Hands to trace
- Paper to trace hands on—this can be construction paper and watercolor, mixed media, or whatever floats your fancy
- Drawing instruments that are not too dark—crayons watercolor paints, and colored pencils are recommended
- Any other type of flat crafting supplies you want—glitter, sequins, stickers
- Frame large enough to fit your family’s handprints
- Background paper
- Scissors
- Tape
- Sharpie
Steps:
- Spread out all your supplies on your crafting (or kitchen) table. If you have the space for it, dump all the crayons, pencils, paints, and other supplies out and spread them all over. This makes it easier for little ones to visualize all their options.
- Trace each family member’s hand on a piece of paper in pencil. You can choose to round out the palm where it meets the wrist, or you can extend the wrist down further.
- Each family member decorates their own hand, taking care not to make the fingers too dark. This is where the fun really happens; let your imagination go wild! Don’t be afraid to mix up mediums either; you can easily throw some watercolor on top of light crayon doodles for a very artistic effect. Don’t forget about the sequins and glitter if you’re a sparkly person! It is so much fun for each person in your family to express their personality onto their own handprint and see them all juxtaposed with each other.
- When each person has completed their hand, go around the table and discuss what each person is thankful for. This will differ based on age and the child’s ability to express. If you have preschoolers, you may focus more on easy things such as “mommy” and “my doggie,” whereas with a teenager you can have a deeper conversation about gratefulness.
- Each person writes down five things they are thankful for—one in each finger with a sharpie. Younger children may need more help writing these or need to practice before committing to the permanent marker.
- Cut out each hand; younger children may also need help with this.
- Now it’s time to mount your thankful hands! Cut a piece of paper the size of your frame and start laying out the hands until you get a composition you are happy with.If your frame is deep enough, you can also get a thin piece of cardboard and cut it down to be half an inch smaller on all sides of your background paper. Wrap it in wrapping paper (think fall-related plaid or brown craft-paper prints) and then arrange your hands on that.
- Be creative when laying out your hands and thinking about layers of paper underneath. Don’t be afraid to layer and interlock fingers, keeping in mind to make sure all your words are still visible.
- When you have your design finalized, add a little piece of rolled tape (or scrapbooking glue dots—whatever you have easily accessible) to keep it in place.
- Frame it and make sure to write on the back the year you created it as well as everybody’s names and ages! In 20 years you may not remember and will be very grateful for this tiny step.
- Hang up and enjoy!
Post Views: 860